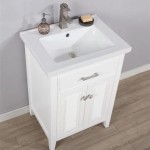
How to Paint a Bathroom Vanity Top: A Comprehensive Guide
A bathroom vanity top often suffers from wear and tear due to humidity, spills, and daily usage. Painting a vanity top offers a cost-effective and aesthetically pleasing solution to refresh the bathroom's overall appearance. Instead of replacing the entire vanity, a fresh coat of paint can breathe new life into the space. This process, although seemingly simple, requires careful preparation and execution to achieve a durable and professional finish. This article details the necessary steps and considerations for effectively painting a bathroom vanity top.
Key Point 1: Preparation is Paramount: Cleaning, Repairing, and Priming
The success of any painting project hinges on meticulous preparation. This phase involves thoroughly cleaning the vanity top, addressing any existing damage, and applying a suitable primer. Skipping or rushing through these steps can compromise the paint's adhesion, durability, and overall appearance.
The cleaning process begins with removing all items from the vanity top, including soap dispensers, toothbrush holders, and any other accessories. Next, use a degreasing cleaner to remove soap scum, grime, and any other surface contaminants. Ensure the cleaner is appropriate for the existing vanity top material. Most commonly, a solution of warm water and mild dish soap will suffice. For stubborn stains, a specialized bathroom cleaner might be necessary. After cleaning, thoroughly rinse the surface with clean water to remove any cleaner residue. Let the surface dry completely before proceeding.
Once the vanity top is clean, conduct a thorough inspection for any damage, such as chips, cracks, or scratches. Small chips and scratches can be filled with an epoxy filler designed for countertops or a specialized wood filler if the vanity is made of wood. Apply the filler according to the manufacturer's instructions, ensuring it fills the void completely and is level with the surrounding surface. Allow the filler to dry completely, and then sand it smooth using fine-grit sandpaper (220-grit or higher). For larger cracks or damage, professional repair might be necessary to ensure structural integrity.
Priming is a crucial step to ensure proper paint adhesion and prevent stains from bleeding through the new paint. Select a primer specifically designed for the type of vanity top material. For example, if the vanity top is made of laminate, an adhesive primer formulated for slick surfaces is essential. Apply the primer in thin, even coats using a high-quality brush or a foam roller. A foam roller is preferred for smooth, consistent coverage. Allow the primer to dry completely according to the manufacturer's instructions. Multiple coats of primer might be necessary, especially if the existing surface is dark or has significant staining. Lightly sand the primed surface with fine-grit sandpaper to create a smooth surface for the paint to adhere to. Remove any sanding dust with a tack cloth before proceeding.
Key Point 2: Selecting the Right Paint and Application Techniques
Choosing the appropriate paint and applying it correctly are crucial for achieving a durable and aesthetically pleasing finish. The paint needs to withstand the humid environment of a bathroom and resist stains and water damage. The application technique will impact the final appearance and longevity of the painted surface.
For bathroom vanity tops, epoxy paints or high-quality acrylic paints are recommended. Epoxy paints offer superior durability and resistance to water and chemicals, making them an excellent choice for high-use areas. However, epoxy paints can be more challenging to work with and may require specialized application techniques. High-quality acrylic paints formulated for kitchen and bathroom use are another viable option. These paints typically contain mildewcides to prevent mold growth and offer good resistance to moisture and stains. Look for paints labeled as "scrubbable" for easy cleaning.
When selecting a paint color, consider the overall bathroom design and aesthetic. Lighter colors can brighten up a small bathroom, while darker colors can add depth and sophistication. It is advisable to test a paint sample in an inconspicuous area before committing to the entire project. Observe the color under different lighting conditions to ensure it complements the existing décor.
The application process involves applying thin, even coats of paint using a high-quality brush or a foam roller. Apply the first coat of paint in the direction of the wood grain (if applicable) or in smooth, overlapping strokes. Avoid applying too much paint in one area, as this can lead to drips and runs. Allow the first coat to dry completely according to the manufacturer's instructions. Lightly sand the dried paint with fine-grit sandpaper (320-grit or higher) to remove any imperfections and create a smooth surface for the subsequent coat. Remove any sanding dust with a tack cloth before applying the second coat.
Apply a second coat of paint using the same technique as the first coat. Ensure complete and even coverage, paying attention to edges and corners. Allow the second coat to dry completely. Depending on the paint's opacity and the desired finish, a third coat might be necessary. If applying a third coat, repeat the sanding and cleaning process before application. Patience is key in achieving a flawless finish. Avoid rushing the drying process, as this can lead to imperfections in the paint.
Key Point 3: Sealing and Curing: Protecting the Painted Surface
Once the paint has dried completely, applying a sealant or topcoat is crucial to protect the painted surface from scratches, stains, and water damage. The sealant acts as a barrier, prolonging the lifespan of the paint and ensuring a long-lasting, beautiful finish. The curing process is equally important, allowing the paint and sealant to fully harden and achieve maximum durability.
Select a sealant or topcoat specifically designed for painted surfaces in high-moisture environments. Polyurethane sealants are a popular choice due to their durability and resistance to water and chemicals. Water-based polyurethane sealants are preferred for their low odor and easy cleanup. Apply the sealant in thin, even coats using a high-quality brush or a foam roller. Use a separate brush or roller from those used for applying the paint to avoid contamination. Follow the manufacturer's instructions regarding drying time and application techniques.
Multiple coats of sealant might be necessary, depending on the desired level of protection. Allow each coat of sealant to dry completely before applying the next. Lightly sand the dried sealant with extremely fine-grit sandpaper (400-grit or higher) between coats to create a smooth surface. Remove any sanding dust with a tack cloth before proceeding.
The curing process is as important as the application process. Allow the painted and sealed vanity top to cure completely according to the manufacturer's instructions. This can take several days or even weeks, depending on the type of paint and sealant used. During the curing process, avoid placing any heavy objects on the vanity top or exposing it to excessive moisture. Be gentle when cleaning the vanity top for the first few weeks. Use a soft cloth and mild soap to avoid damaging the newly painted surface. Avoid using abrasive cleaners or harsh chemicals, as these can scratch or dull the finish.
Maintaining the painted vanity top involves regular cleaning with a soft cloth and mild soap and water. Promptly wipe up any spills to prevent staining. Consider using placemats or coasters to protect the surface from scratches and water rings. Inspect the painted surface regularly for any signs of damage, such as chips or scratches. Touch up any damaged areas with a small amount of paint and sealant to prevent further deterioration. With proper care and maintenance, a painted bathroom vanity top can provide years of beauty and functionality.

Paint Bathroom Vanity Countertop Sink So Easy A Piece Of Rainbow
:strip_icc()/101922779-2cbc45e123c34827afb4f601723b03ca.jpg?strip=all "How To Paint Bathroom Countertops")
How To Paint Bathroom Countertops

Paint Bathroom Vanity Countertop Sink So Easy A Piece Of Rainbow

Paint Bathroom Vanity Countertop Sink So Easy A Piece Of Rainbow

How To Paint A Countertop Don T Make These Mistakes Blessed Beyond Crazy

How To Paint A Bathroom Countertop Ace Hardware Youtube

I Have Always Wanted To Paint My Bathroom Countertop Hometalk

Can You Paint A Countertop Re Sick Of Absolutely Recreated Designs

Paint Bathroom Vanity Countertop Sink So Easy A Piece Of Rainbow
.jpg?strip=all "Painting A Bathroom Vanity Again Dream Green Diy")
Painting A Bathroom Vanity Again Dream Green Diy