Replacement Doors For Bathroom Vanity: A Comprehensive Guide
Bathroom vanities are essential components of bathroom design, providing valuable storage space and contributing significantly to the overall aesthetic. Over time, however, the doors of these vanities can become worn, outdated, or damaged, impacting the bathroom's appearance and functionality. Replacing the entire vanity can be costly and disruptive. Fortunately, replacing only the doors offers a practical and cost-effective alternative to refresh the bathroom's look and extend the life of the vanity itself. This article provides a comprehensive guide to replacement doors for bathroom vanities, covering considerations, options, the replacement process, and maintenance tips.
Understanding the Need for Replacement Doors
The doors of a bathroom vanity are the most visible part of the unit, subject to daily use and exposure to moisture and humidity. This constant use can lead to a variety of issues that necessitate replacement. These issues can range from purely cosmetic problems to functional impairments that affect the overall usability of the vanity.
One common reason for door replacement is simply aesthetic preference. Styles and trends change, and a vanity with outdated door designs can detract from the modern feel of an updated bathroom. Perhaps the existing doors feature a style that no longer complements the current décor. Replacing the doors provides an opportunity to update the vanity's appearance without the expense of a full renovation.
Damage is another frequent cause of door replacement. Constant exposure to moisture can lead to warping, peeling, or swelling of the door material, particularly in vanities made of lower-quality materials. Scratches, dents, and stains are also common occurrences that can accumulate over time, diminishing the door's appearance. In some cases, hinges and other hardware can break or become loose, affecting the door's ability to open and close properly. These mechanical issues can render the vanity less functional and necessitate repair or replacement.
Furthermore, replacing doors can be a strategic decision to increase the value of a home. A bathroom with updated features is more appealing to potential buyers. Replacing worn or outdated vanity doors can be a relatively inexpensive way to improve the bathroom's overall appeal and enhance the home's marketability.
Exploring the Options for Replacement Doors
When considering replacement doors for a bathroom vanity, a wide range of options are available in terms of materials, styles, and finishes. The choice of door will depend on the existing vanity's construction, the desired aesthetic, and the budget.
Materials:
Several materials are commonly used for bathroom vanity doors, each with its own advantages and disadvantages:
- Wood: Solid wood doors offer a classic and durable option. Different types of wood, such as oak, maple, cherry, and birch, provide varying grain patterns and colors. Solid wood doors can be stained or painted to match the desired aesthetic. However, solid wood is susceptible to moisture damage if not properly sealed and maintained.
- Wood Veneer: Wood veneer doors consist of a thin layer of real wood applied to a core material, such as particleboard or MDF (medium-density fiberboard). Veneer doors offer the look of solid wood at a lower cost. They are also less prone to warping than solid wood. However, the veneer layer can be damaged if scratched or dented.
- MDF: MDF is a manufactured wood product made from wood fibers and resin. MDF doors are smooth and uniform, making them ideal for painting. They are also less expensive than solid wood doors. However, MDF is susceptible to water damage and should be properly sealed, especially in a humid bathroom environment.
- Laminate: Laminate doors consist of a plastic laminate layer applied to a core material, such as particleboard or MDF. Laminate doors are durable, easy to clean, and resistant to moisture. They are available in a wide range of colors and patterns, including wood-grain patterns. However, laminate doors may not have the same aesthetic appeal as solid wood or veneer doors.
- Thermofoil: Thermofoil doors are made by applying a thin layer of vinyl to an MDF core using heat and pressure. Thermofoil doors are seamless, easy to clean, and resistant to moisture. They are available in a variety of colors and styles. However, thermofoil can be susceptible to peeling or bubbling if exposed to excessive heat or moisture.
Styles:
The style of the replacement doors should complement the overall design of the bathroom. Some popular styles include:
- Shaker: Shaker doors are characterized by a simple, clean design with a flat center panel and a frame around the perimeter. Shaker doors are versatile and can be used in a variety of bathroom styles, from traditional to contemporary.
- Raised Panel: Raised panel doors feature a center panel that is raised above the surrounding frame. Raised panel doors add a touch of elegance and formality to the bathroom.
- Flat Panel: Flat panel doors have a smooth, flat surface with no detailing. Flat panel doors offer a minimalist and contemporary look.
- Glass Panel: Glass panel doors feature a glass insert in the center of the door. Glass panel doors can add a touch of sophistication and allow you to display items inside the vanity. Different types of glass, such as clear, frosted, or textured glass, can be used to achieve different effects.
- Slab Door: Slab doors are simple, frameless doors with a flat surface. They offer a minimalist and modern aesthetic often used in contemporary bathrooms.
Finishes:
The finish of the replacement doors should match or complement the existing bathroom fixtures and décor. Common finishes include:
- Paint: Painted doors offer a wide range of color options. Paint can be applied to solid wood, MDF, or other materials.
- Stain: Stained doors enhance the natural grain of the wood. Stains are available in a variety of colors, from light to dark.
- Glaze: Glazes can be applied over paint or stain to add depth and dimension to the doors.
- Distressed: Distressed finishes create a rustic or antique look by adding intentional wear and tear to the doors.
- Natural: A clear coat finish allows the natural beauty of the wood to show through.
The Replacement Process: A Step-by-Step Guide
Replacing bathroom vanity doors is often a manageable DIY project, but it's important to approach the process with planning and precision. A careful and methodical approach ensures a successful outcome.
1. Precise Measurement:
The first and most crucial step is accurate measurement. Measure the existing doors carefully, noting the height, width, and thickness. It is essential to measure each door individually, as slight variations may exist, particularly in older vanities. Measure from edge to edge, and be precise to the nearest 1/16th of an inch. Document these measurements clearly. This information will be vital when ordering the replacement doors to ensure a proper fit.
2. Hardware Considerations:
Determine whether the existing hinges and knobs or pulls will be reused or replaced. If reusing the hardware, ensure it is in good working condition and that it is compatible with the new doors. If replacing the hardware, choose styles and finishes that complement the new doors and the overall bathroom design. Note the location of the existing hinge holes on the vanity frame and on the doors. This information is crucial for ensuring that the new doors align correctly and swing smoothly.
3. Purchasing the New Doors:
With the measurements and hardware considerations in hand, it's time to purchase the replacement doors. Many options are available, including online retailers, home improvement stores, and custom cabinet makers. When ordering doors, double-check the dimensions, material, style, and finish to ensure they meet the specific requirements. If ordering online, review the retailer's return policy in case the doors arrive damaged or do not fit properly. When selecting a custom cabinet maker, provide them with detailed measurements and specifications to ensure a precise fit.
4. Preparing for Installation:
Before installing the new doors, prepare the work area. Cover the surrounding surfaces with drop cloths to protect them from scratches and dust. Gather the necessary tools, including a screwdriver, drill, measuring tape, level, and pencil. If the new doors require drilling for hinges or knobs, use a template or measuring tape to mark the locations accurately. Ensure the vanity frame is clean and free of debris before installing the new doors.
5. Installing the New Doors:
Carefully align the new door with the vanity frame, matching the hinge locations. Attach the hinges to the door and then to the frame, using screws of the correct length. Avoid overtightening the screws, as this can strip the holes. Once the door is installed, check its alignment and swing. If the door is not aligned correctly, adjust the hinges until it is properly aligned. If the door rubs against the frame, you may need to shim the hinges or adjust the frame. Install the knobs or pulls according to the manufacturer's instructions.
6. Final Adjustments:
After installing all the doors, take a step back and inspect the overall appearance. Ensure that all the doors are aligned, that they swing smoothly, and that the hardware is securely attached. Make any necessary adjustments to the hinges or knobs to achieve the desired look and functionality. Clean the doors with a soft cloth to remove any dust or fingerprints.
Maintaining Your Replacement Doors
Once the replacement doors are installed, proper maintenance is essential to prolong their life and maintain their appearance. Regular cleaning and care will help prevent damage and ensure that the doors continue to enhance the bathroom's aesthetic.
Regular Cleaning: Clean the doors regularly with a mild soap and water solution. Avoid using harsh chemicals or abrasive cleaners, as these can damage the finish. Wipe the doors dry with a soft cloth to prevent water spots. For laminate or thermofoil doors, a damp cloth is usually sufficient for cleaning.
Moisture Control: Bathroom environments are often humid, which can damage wood doors. Ensure adequate ventilation in the bathroom by using the exhaust fan during and after showers or baths. Consider using a dehumidifier to control the humidity levels in the bathroom. Wipe up any spills or water splashes on the doors immediately to prevent water damage.
Hardware Maintenance: Periodically check the hinges and knobs or pulls to ensure they are securely attached. Tighten any loose screws. Lubricate the hinges with a silicone-based lubricant to keep them working smoothly.
Scratch and Dent Repair: Minor scratches and dents can be repaired with touch-up paint or wood filler. Follow the manufacturer's instructions for applying the touch-up paint or wood filler. For more severe damage, it may be necessary to consult a professional repair service.
Sunlight Protection: Excessive exposure to direct sunlight can fade or discolor the doors. Consider using window treatments to protect the doors from direct sunlight.

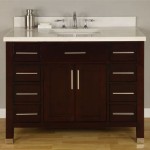
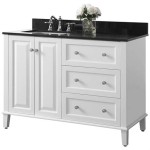
Update Your Bathroom Vanity With New Cabinet Doors The Handyman S Daughter

Update Your Bathroom Vanity With New Cabinet Doors The Handyman S Daughter

Acrylic Bathroom Doors

Update Your Bathroom Vanity With New Cabinet Doors The Handyman S Daughter

How To Replace Cabinet Doors In One Weekend

Hdb Toilet Door Replacement Repair Services Singapore

Painted Cabinets Vs Replacement Cabinet Doors

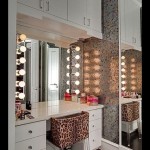
Mirror Doors Repairs Replacement Valiant Glass Sydney

Shaker Style Custom Sized Replacement Cabinet Doors Etsy

Door Replacement With Profiled Or Flush Procoat Kitchens